
File system checker: In command prompt, execute the following commands as administrator
DISM.exe /Online /Cleanup-image /Restorehealth
sfc /scannow
chkdsk C: /fFile system checker: In command prompt, execute the following commands as administrator
DISM.exe /Online /Cleanup-image /Restorehealth
sfc /scannow
chkdsk C: /fEnable shared folder
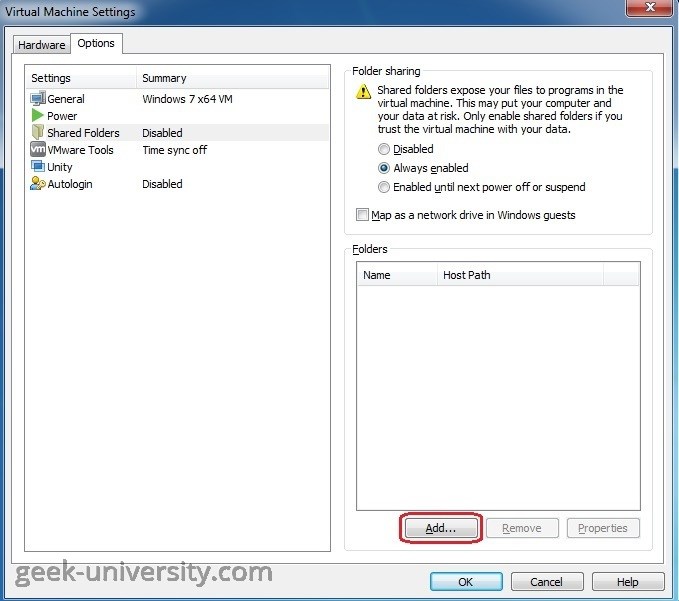
Go inside the virtual machine and execute the following command:
sudo vmhgfs-fuse .host:/ /mnt/hgfs -o uid=1000 -o gid=1000 -o allow_otherGet back to virtual machine settings and add/enable a new folder. This way, the folder should be accessible for the current user having UID=1000 and GID=1000
Persistent Mounts
Method 1: Specifying the file system
<file system> <mount point> <type> <options> <dump> <pass>
Example:
vmhgfs-fuse /mnt/hgfs fuse defaults,allow_other 0 0
Method 2: Specifying the remote server and share
<server>:</remote/export> </local/directory> <fuse-type> <options> <dump> <pass>
Example:
.host:/ /mnt/hgfs fuse.vmhgfs-fuse defaults,allow_other 0 0
List messages:
mailq
or
postqueue -p
View message content:
postcat -vq <msgId>Reprocess messages:
postqueue -f
or
postfix flush
Delete messages selectively:
mailq | tail +2 | awk 'BEGIN { RS = "" } / falko@example\.com$/ { print $1 }' | tr -d '*!' | postsuper -d -Dump source database:
pg_dump -C -h hostname -U postgres databse > database.sqlLoad the structure into the new database:
psql -U postgres -d database -f database.sqlLog in to the database:
psql -U postgresExecute the following commands:
CREATE DATABASE yourdbname;
CREATE USER youruser WITH ENCRYPTED PASSWORD 'yourpass';
GRANT ALL PRIVILEGES ON DATABASE yourdbname TO youruser;
For PostgreSQL servers with versions greater than 15, we have to run the following:
\c yourdbname
GRANT USAGE, CREATE ON SCHEMA public TO youruser;To reset NTFS Permissions in Windows 10, do the following:
#for file
icacls "full path to your file" /reset

#for folder
icacls "full path to the folder" /reset

#for folder, files and subfolders
icacls "full path to the folder" /reset /t /c /lBy default, Nautilus is showing the path bar:

Use Ctrl+L to switch to address bar:

In Linux, a group is a unit in which you can manage privileges for several users simultaneously. Linux groups allow you to manage multiple user permissions quickly and easily.
#Create group if it doesn't exist:
sudo groupadd new_group

#Add user:
sudo adduser user_name new_group
or
#Create user and add it to group:
sudo useradd –G new_group new_user

#Set user password:
sudo passwd new_user#Remove from group:
sudo gpasswd –d user_name new_group
#or Change user primary group:
sudo usermod –g new_group user_name#All groups:
sudo nano /etc/groups
#or current user groups:
groupsEven if you don’t already know how to use the command, scp should be a bit more familiar to you thanks to its similarity to ssh. The biggest differences come with specifying file/directory paths.
Download file/directory
scp user@ssh.example.com:/path/to/remote/source /path/to/local/destination

scp -r user@ssh.example.com:/path/to/remote/source /path/to/local/destination
Upload file/directory
scp /path/to/local/source user@ssh.example.com:/path/to/remote/destination

scp -r /path/to/local/source user@ssh.example.com:/path/to/remote/destination On Linux, gzip is unable to compress a folder, it used to compress a single file only. To compress a folder, you should use tar + gzip, which is tar -z.
Create archive
tar -zcvf archive.tar.gz folder1/ folder2/ folder3/ ..Inflate archive
tar -xvf archive.tar.gz